
You often hear about the production triangle, the three points of which are fast, cheap, and good. The purpose of the triangle was to remind video makers that you can only have two of the three points – never all three. However, with the emergence of cutting-edge tools like compact mirrorless cameras, drones, and LED lights, it’s safe to say that the truth of the production triangle has come into serious question.
While it’s true that creating impeccable video content takes craft and discipline and there are no shortcuts, there are plenty of efficient practices to help accomplish your goals – now more than ever before. Whether it’s a technique or piece of gear, here are our top ten tips and tools – from pre-production through post – that will get your next video production running smoother, cheaper, and most of all, smarter.
PREPRODUCTION
10. Tip – Know your final format
To create a more efficient workflow, it’s very important to know what your distribution platform will be, as this will help you make a smarter decision on what camera you should choose. If you’re working with a tight budget, renting a Canon C300 package over an Arri Alexa package will cut your camera budget in half. Although ARRIRAW or 6K .R3D files give you undoubtedly amazing quality, shooting 1920x1080 Canon Log to CF cards is more than sufficient if your project’s going straight to the web. It will also simplify your on-set and post storage workflow. It’s important to remember that most people working in broadcast (web or television), don’t have the time or budget to deal with a raw workflow. ProRes and Avid DNxHD are great intermediate codecs that still provide high bitrates and are intended for efficient use during post.
Again pre-production is all about thinking ahead. The more thought that goes into prep, the fewer hassles you’ll face during production and post.
9. Tool – Keep track of locations with Panavision’s Panascout
For any live-action project, top-notch locations is half the battle when it comes to eye-catching visuals. Mobile phones and tablets with built-in GPS and high-quality cameras have become the industry-standard tool for location scouts. Panavision’s Panascout is an essential app that makes location scouting with your mobile device a dream.
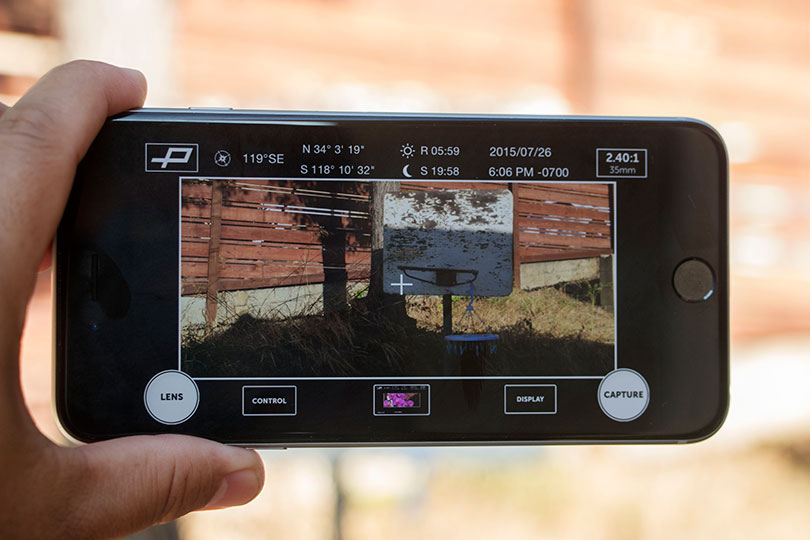
With Panascout Pro, you can capture shots to show your producers and crew, including multiple aspect ratios, video capture with framing overlays, lens choices, and more. And because your smart phone contains GPS capabilities, Panascout has an advantage over stills and notes because the photos, or “Panascouts,” which give you both longitude and latitude coordinates of your photo and location. You’ll now be able to locate that amazing remote spot you visited in the wild.
PRODUCTION
8. Tip – Reduce on-set headaches with an experienced DIT
If you’re not on a shoestring budget, one smart decision is to hire a DIT (Digital Imaging Technician). The DIT is a member of the camera crew who collaborates with the director of photography on workflow, camera settings, creating a good signal and, depending on the size of your crew, offloads data from your cards to drives that are sent to post. But the DIT really comes into their own when helping the cinematographer create a LUT (Lookup Table) that allow you to see a more nuanced or finished look while working on set, rather than the flat, neutral, look you see when shooting in Raw or Log.
Cinematographers have enough hats to wear on today’s sets and with file-based production being the norm, a DIT can help take a production from good to better.
7. Tip – Shoot HDR for high-contrast locations
For a shooter aiming for film-like images with digital tools, dynamic range is king, since blown-out highlights are video’s big giveaway. In the past, cinematographers would use graduated neutral density filters to take down highlights at the top of the frame (sky) while everything beneath the sky would be properly exposed. The big problem with graduated ND filters is that they don’t work for most daylight interiors so your windows would clip if ND gels weren’t applied to them – a time-consuming job.
If you don’t have the camera crew to properly light a location, HDR (high dynamic range) could save you both time and money. The technique, which is well known in still photography, blends multiple exposures into a single frame that combines both the brightest and darkest range of the frame. For cinematography, HDR improves and increases your latitude on set, as well as improving image quality for scenes with high contrast.
RED was one of the first camera manufacturers to go all-in with HDR. Their HDRx technology records two tracks simultaneously—a normal exposure (A-frame), and an exposure that will protect your highlights (X-frame) by using an adjustable shutter speed that is up to 6 stops faster. When working in REDCINE-X, you’re able to blend the tonal levels from the X-frame, giving you higher dynamic range since your brightest whites now have detail.
6. Tool – Focus like a pro with Canon’s Dual Pixel CMOS AF
Obtaining sharp focus on a moving subject is a difficult job for any shooter, especially on a long lens. For high-end productions, achieving critical focus usually involves a camera assistant with years of experience, a follow-focus device, lens gears, and more.
If you’re a single operator on a production, one technology that will seriously boost your focusing skills is Canon’s Dual Pixel CMOS AF. First introduced on the 70D, Canon’s engineers developed an algorithm that would allow the camera to autofocus quickly on a wide variety of subject matter, including high-contrast situations such as sunshine flickering through foliage or reflecting off car hoods.
Compared to other AF systems, Dual Pixel CMOS AF’s focus-pulls look very organic and man-made and Canon has transferred the technology to its Cinema EOS class of digital cinema cameras. Their new C300 Mark II has a new version of Dual Pixel AF that expands the autofocus area to 80% vertically and 80% horizontally. It can also capture face detection with EF lenses, as well as with Canon’s STM lenses. Shooters can adjust the speed, track sensitivity, and define the specific size and location of the focusing area for better control, and there’s a new feature called AF-Boosted MF, which gives you increased stability.
For run-and-gun shooters, this technology is a game changer.
5. Tool – Get more from your camera with Metabone’s BMPCC T Speed Booster
One of the best lens “hacks” for video makers is Metabones’ BMPCC T Speed Booster, a unique EF-lens adapter for the popular Blackmagic Pocket Cinema Camera. The 0.58x Speed Booster reduces the crop factor of the BMPCC from 3.02x to 1.75x. A 21mm lens without a Speed Booster would be more like a 60mm lens, making wide shots difficult to achieve no matter how wide the lens is. With the Speed Booster, an EF 21mm lens becomes roughly a 35mm lens. Perhaps even more valuable is that the Speed Booster increases your maximum aperture by 1-2/3 stop with a maximum output aperture of f/0.74.
Essentially, this one accessory turns your $995 camera into a powerhouse digital cinema camera.
POSTPRODUCTION
4. Tool – Remove shake with Adobe’s Warp Stabilizer
Although handheld shooting can give a highly effective aesthetic, unintentional shaky camera movement simply screams “amateur”. Adobe’s Warp Stabilizer, which can be used in both After Effects CC and Premiere Pro CC, can stabilize unwanted camera movement or shakiness. In Premiere Pro, you simply drag the effect to the clip in your timeline and it analyzes and then applies the effect automatically. You do need to make sure that your clip dimensions match your sequence settings.
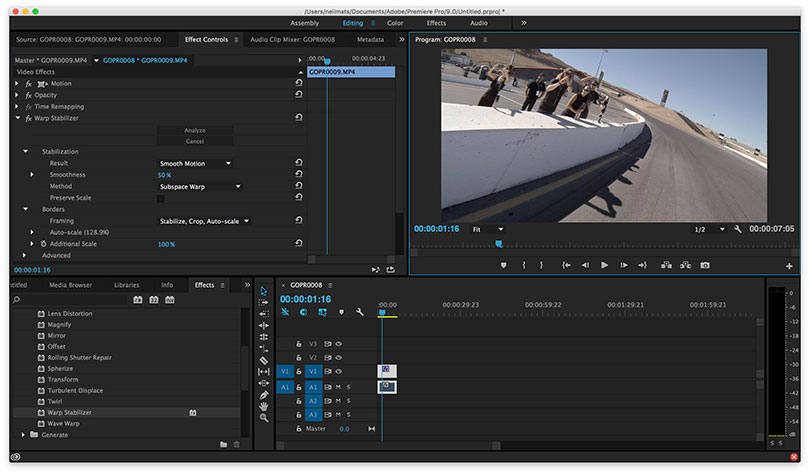
For video makers on a budget, Warp Stabilizer can sometimes function as a camera slider, dolly, or even jib arm – a total game-changer.
3. Tool – Top color grading (and editing) with DaVinci Resolve 12
As with production tools, post software and hardware is trending to the 99% over the 1%. VFX pioneer Rob Legato (The Wolf of Wall Street, Avatar) recently revealed that today he could have done the visual effects for Apollo 13 on a laptop using Creative Cloud. "Yes, the same computer you do your taxes on," he confirmed.
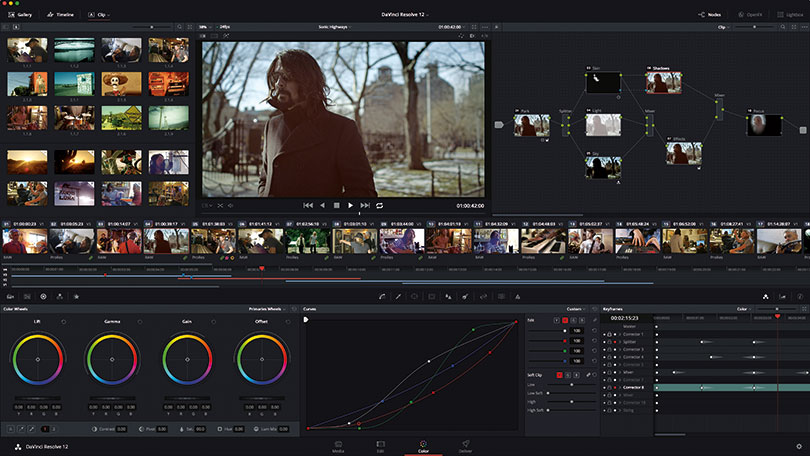
Blackmagic Design’s DaVinci Resolve is perhaps the industry-standard color-grading system. No longer just a color-grading tool, Resolve now has a multi-track timeline with context-sensitive editing tools, real-time multi-camera editing, asymmetric and dynamic trimming, a new mixer, audio plug-ins, keyframe animation with on-screen motion paths, new media management tools and much more. Best of all it’s free, as long as you’re working in SD, HD or UHD projects. DaVinci Resolve 12 Studio ($995) gives you temporal and spatial noise reduction, optical-quality motion-blur effects, support for multiple GPUs, DCI 4K, 3D stereoscopic tools, multi-user collaboration tools, remote rendering and more. If you don’t currently have an NLE, I highly recommend trying Resolve 12.
2. Tool – Final Cut Pro X for speedy editing
NLE (Non Linear Editing) systems have gone through some big changes in the past few years. Led by Adobe, subscription services have dominated the marketplace. Adobe’s Creative Cloud ($50/month) gives subscribers access to a large collection of software not only for video makers but also for graphic and web designers. But if you don’t want to pay for a monthly subscription, Apple’s Final Cut Pro X is a great post workflow solution.
When it was first announced back in 2011, the professional editing community was outraged by how Apple’s new version of FCP, which was designed from the ground up as a new NLE, had become a “consumer” platform. But after four years, it’s safe to say Final Cut Pro X (v.10.2) has evolved into a powerful and professional editing application. It offers great features such as 3D titling, easy multi-cam editing, color grading and masks, and perhaps above all, the revolutionary Magnetic Timeline. For short videos, I often use Final Cut Pro X over anything else because I find myself editing much faster using the Magnetic Timeline. The program runs only $299 and there are no monthly subscription fees.
01 Tip – Great communication via Wipster
Good films usually share one thing in common – good communication throughout. One of the best platforms for review and commenting between collaborators during post is Wipster.
In terms of the process, you simply upload your work-in-progress video and email it to your collaborators directly from the site. Once they receive it, one click takes them to the video on Wipster, where they begin making notes. Their feedback is logged and you receive an email with the exact frame and comment, as well as a reply button to return to Wipster to see the video again. You no longer have to gather dozens of email chains over the course of a project, saving you masses of time.
So what are you waiting for? It’s time to shoot! But before you do, please let us know if you have any tips and tools to help restore those three points of the production triangle.
Neil Matsumoto is the former editor of HDVideoPro and ICG Magazine and a regular contributor to American Cinematographer. He’s also a filmmaker, who’s shot two features and over 20 shorts.