Media Cache Files in Premiere Pro can have a significant impact on performance during the editing. Do you struggle with smooth playback in Premiere Pro from time to time?
It’s easy to assume that a better computer would solve the problem. But this isn’t necessarily the truth. While obviously having a decent machine will do no harm, Cache Files management can be the real answer. Something that makes a significant difference.
Let’s dive in.
Media Cache Files are temporary files Premiere Pro uses for better performance. Each time you import a new video or audio file into a project, media cache files are being created which is indicated by a progress bar in the bottom right corner. Sounds familiar, right?
If they’re managed correctly, they can ensure proper performance during the editing process. On the other hand, sometimes these files get corrupted and in such a case they can cause a lot of problems. Should you delete them in this case? In the following video, we take a closer look at the topic.
Time for the takeaways.
Dedicated Storage for Media Cache
Be sure to allocate as much space to these files as possible in the Media Cache Management section of Preferences.
Whenever possible, you should have a disk dedicated to cache files to separate them from the operating system, the software, and footage. This alone should noticeably speed up Premiere Pro’s performance.
It would be best to have a dedicated SSD for that purpose. However, if you only have a spare USB 3.0 external HDD, it’s still worth to use it.
You can manually change the location for cache files in Preferences - Media Cache.
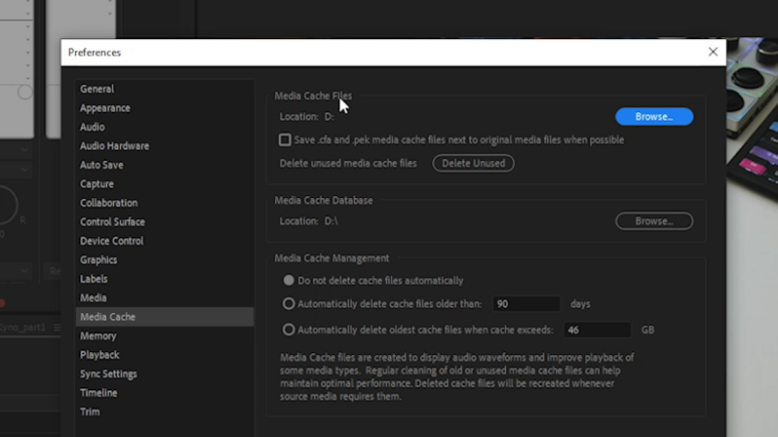
There’s also a position for Media Cache Database which links together projects and specific cache files. The database is much smaller than the Media Cache so it’s not that important to move to an external location. However, if you have a dedicated drive, just go ahead and move the database as well.
Automation rule for deleting Media Cache
You can decide if Premiere Pro should automatically delete Cache Files based on when they were created or after a given size limit is reached.

Both options are good. If you have a dedicated drive, I think it’s better to limit the size of Media Cache because in this way you can use a whole drive. If not, I think that going with the files age option is better. Still, feel free to choose the one that works better in your case.
Deleting Media Cache on demand
You can always delete Media Cache files. This will not delete anything from the project. Premiere Pro will just need to regenerate Cache files for a given project on a launch. But if you’re having issues with Premiere Pro's performance, the benefits can be potentially huge.
If you’re having performance issues, sometimes this procedure alone can be a fix.
Keep in mind that the Clean Unused option in Preferences deletes those cache files that are linked to clips previously deleted or moved to another location and no longer available.
Due to that fact, cleaning Cache in Preferences may not solve the problem with corrupted cache files.
Performing this task manually will delete all cache files including the ones that are in use in a working project (don’t worry, they will be rebuilt once you relaunch the project).

What follows is the order of operations you should follow to Clear Cache files and reset Preferences. Just make sure that before you continue your preferences are uploaded and synced to Creative Cloud. To do it just go to File - Sync Settings. You can manage what is being uploaded in the Preferences - Sync Settings tab.
OK, here’s the process.
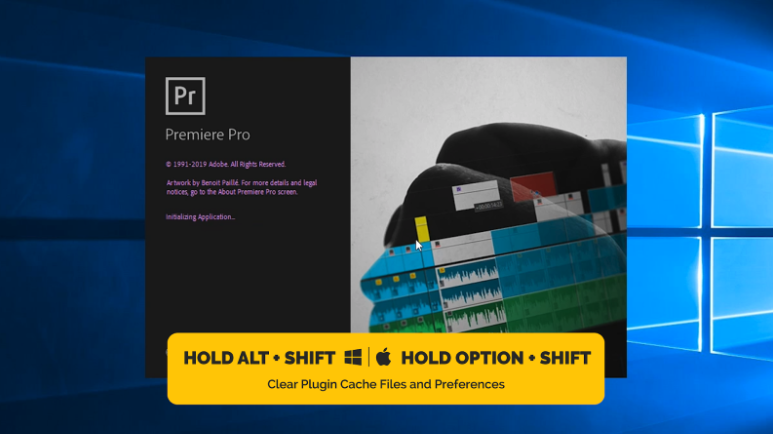
Step no. 1: Close Premiere. You can use a keyboard shortcut Ctrl + Q (Mac: Cmd + Q).
Step no. 2: Double-click on the Premiere Pro icon to open the program.
Step no. 3: A moment after clicking on the icon hold Alt + Shift (Mac: Option + Shift). It should clear Preferences and Plug-in Cache.

Previous projects will not be visible and if you run Premiere Pro 13.0 (CC 2019) or later version, it’ll ask you if you’re sure that you want to perform this operation.

Step no. 4: If it didn’t help, it’s time to manually clear all Media Cache files. If you’ve set up your own Cache location, then you know where to go in order to do it. If not, go to the following directory:
Windows: \Users\<username>\AppData\Roaming\Adobe\Common\Media Cache Files
macOS: /Users/<username>/Library/Application Support/Adobe/Common/Media Cache Files

The directory may feel a bit weird for the Cache location but this is the directory where Premiere Pro can write files even if a user is not an admin.
What seems obvious to me is that we should be able to perform such a deep clean operation from Premiere Pro’s preferences.
If you wish to reset Premiere Pro’s preferences alone (once you removed Cache files manually), just hold Alt (Option) after clicking on the Premiere Pro icon.
Last but not least, some issues that may look like something is wrong with a project, can be actually caused by the Creative Cloud app itself. If you want to force restart of the CC app open it and hit Ctrl + Alt + Shift + R (Mac: Cmd + Opt + Shift + R). It may help with synchronization issues or when any Adobe App is not behaving in a normal way.

Finally, if you want to read more, you can visit this thread on the Adobe website. Let us know about your Media Cache setup. Do you have a dedicated SSD drive?
You may also be interested in trying out the Wipster Review Panel in Adobe Premiere Pro. Download the extension, and then you can export and share media files for review directly from Premiere.