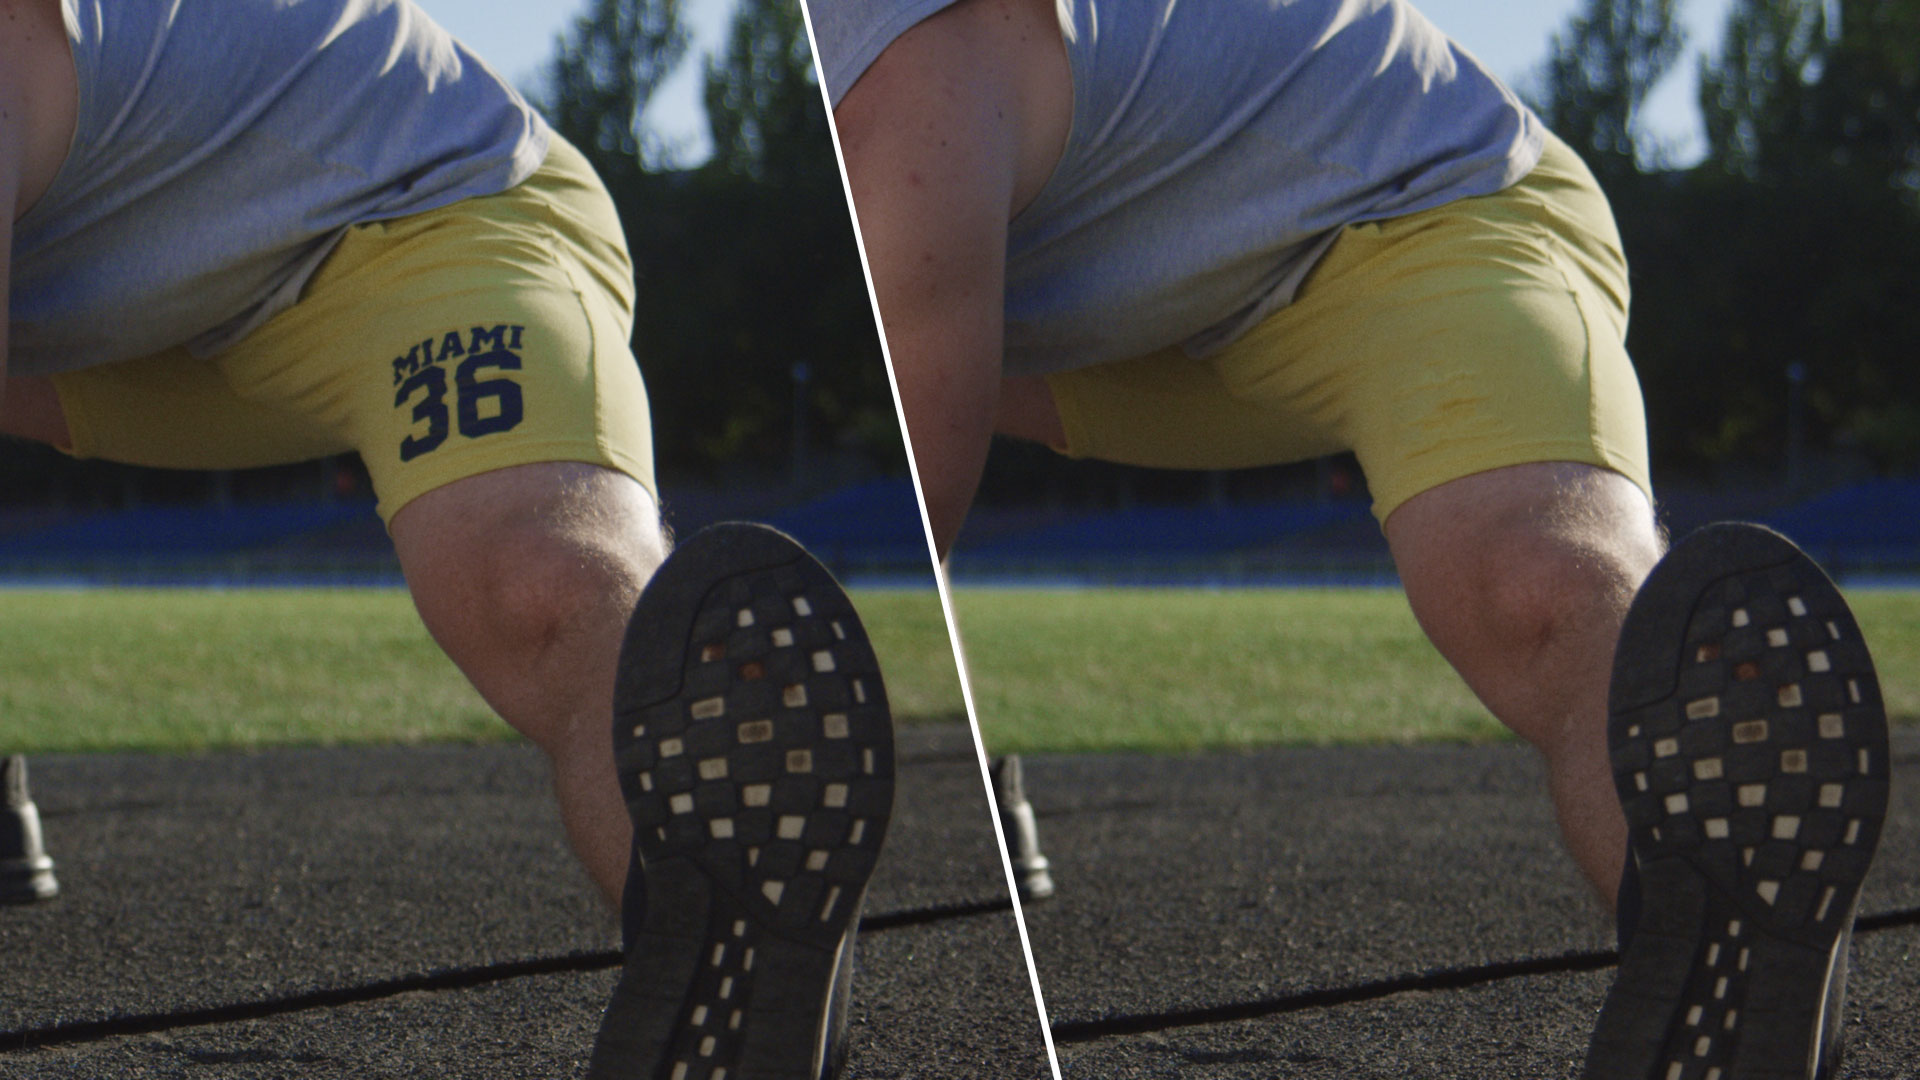
Have you ever struggled with removing a logo from a shirt, a microphone at the edge of an interview shot or random trash at the ground in a steady-cam shot?
In the new Spring 2019 release, Adobe introduced Content-Aware Fill to After Effects (version 16.1). The tool you might already know from Photoshop. Instead of removing an object from only one picture it works for video clips. It analyzes frames before and after the current one and fills the area of interest with matching pixels.
I feel like the industry agrees that it’s the most exciting addition to After Effects in years! Let’s see how to work with this tool, what can it do for us, and what we need to be aware of.
If you want to remove a static element from a static shot it can be easily done. You just create what we call a clean plate and mask it out in an area of interest. But if this is not a case and the camera and object are moving, then object removal is a very tedious task. At least it used to be. Because Content-Aware Fill removes not only objects but a lot of headache in that process as well ;) Let’s explore the new tool.
“Instead of removing an object from only one picture it works for video clips. It analyzes frames before and after the current one and fills the area of interest with matching pixels.
First Step: Create a Mask
The first step is to create a transparent area over the unwanted object. It doesn't matter which tool you use to do it. Most often the mask will be used for that purpose but you could use keying, alpha matte, or even the Roto Brush.
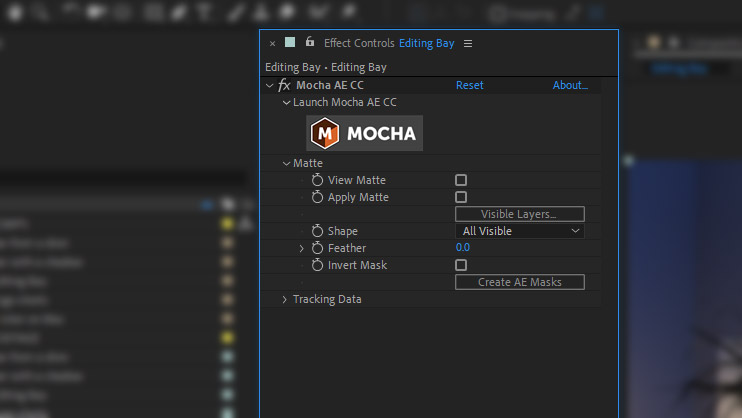
If there is a movement of the camera or an object we want to remove in the shot we also need to track that motion. Actually, the mask and tracking do not have to be done with surgical precision for the tool to work. Still, if the movement is extensive or complicated you may want to use Mocha plugin for tracking. This way you don't have to keyframe the position of the mask yourself. Also, a big advantage of this approach is the “Create AE Masks” button for this effect.
Getting Started with Content-Aware Fill
To open a new panel go to Window - Content-Aware Fill. At the top of it, you’ll find an alpha channel of the composition. All visible layers are taken into consideration so if you don’t want a given layer to be included, just turn its visibility off.
This Alpha Expansion slider simply makes this transparent area wider if you increase that value. It may be a way to better results.
But the most important option we need to choose is the Fill Method.

Fill Method Types
-
Object is best for getting rid of moving objects in a frame. Examples for which this method should be used: driving car, pedestrians, object in a steady-cam shot.
-
Surface is best for static surfaces that can move in the frame but don’t contain moving elements itself. Examples for which this method should be used: a poster on a wall, sign on the wall, text in a book.
-
Edge Blend is best for removing static objects on surfaces that lack texture. Examples for which this method should be used: sticker on a smooth surface, an object in out of focus monochromatic background.
Object Fill Method is the most advanced one but it also takes more time to analyze than the other two.
With Range selector, we simply choose between rendering the fill layer for a work area or for an entire duration of the composition. Very often it will be the same.
Create A Reference Frame
Content-Aware Fill is supposed to work even in pretty complex situations with big objects. But in these scenarios very often we need to “help” After Effects to find out how it’s supposed to remove something. We do it by clicking on Create Reference Frame button. A single frame layer will appear and Photoshop will open automatically. Then we can create a clean plate using the clone stamp tool and other Photoshop tools to “show” After Effects what the image should look like. It will be taken into consideration by Content-Aware Fill when rendering the rest of the frames.
For long takes when the lighting or camera angle changes significantly, you may want to create multiple Reference Frames.
So, are we ready to click Generate Fill Layer button? Almost!
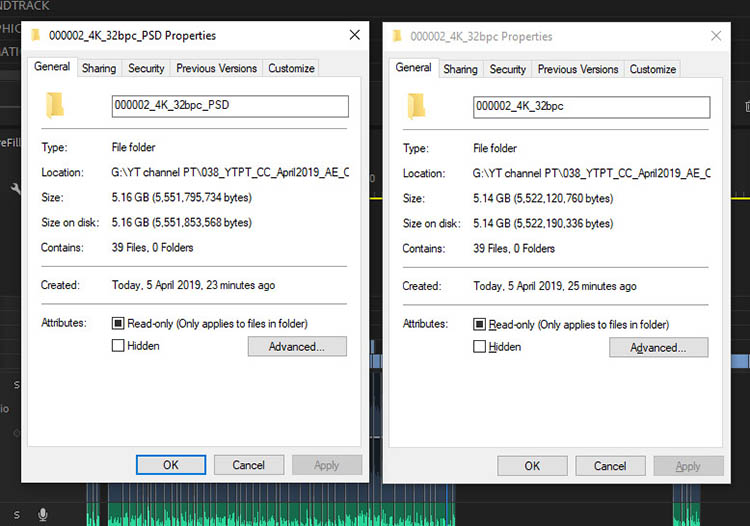
Image Fill Sequences are Big! Be prepared.
There’s one caveat to working with this new tool. The image sequence that will be generated are very large. As an example, 2 seconds long 4K clip in 32 bits per channel will generate about 6GB of data (Depending on how many frames per second you deal with)!
We’ll need a lot of storage for those sequences! Therefore it’s good to tweak Output Depth setting. To open the dialog with these options we click the menu icon and choose Content-Aware Fill Settings.
There are the following Output Depth options to choose from:
-
Project Depth
-
8 bpc
-
16 bpc
-
32 bpc
Obviously, if you choose 32 bits per channel the image will be bigger than in the case of 8 bpc.
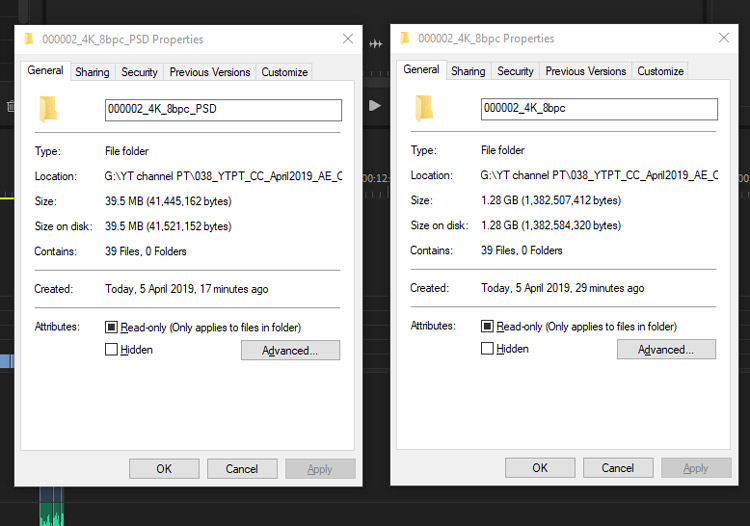
I’ve run some tests and the smallest image size was generated for an 8-bit sequence of Photoshop files. This is weird but choosing to Create Photoshop Sequence for Output option actually reduced file size significantly for 8 bpc. And this is a very good setting if you just want to distribute to the web and if Content-Aware Fill is done as the last step before exporting.
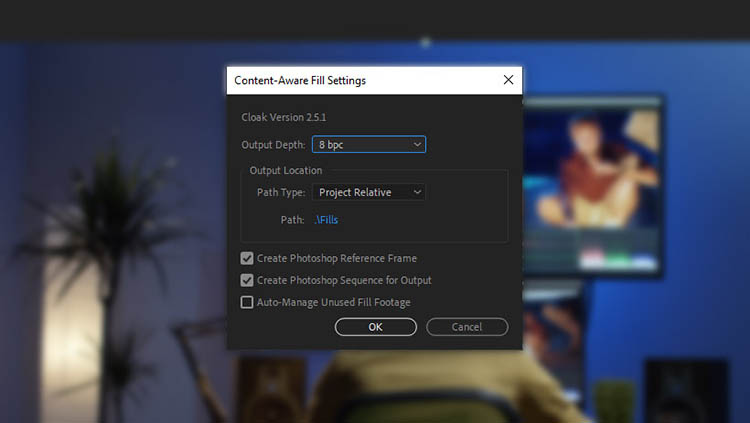
However, if the final video clip will be color graded or handed to VFX artist, you should export to a 16 or 32 bpc image sequence. So just bear it in mind :)
Another thing you could do to limit the size of the image sequence is to make sure that you’re working with a resolution for distribution instead of clip’s full resolution. So if you want to distribute a 1080p file, there’s no sense in working with 4K footage. This way the image sequence would “devour” 4 times more storage.
Now we can finally hit the Generate Fill Layer button and the analysis begins. The frame under the time indicator is prioritized so if the results don’t look promising you can stop the tool and tweak the settings.
The Fill Layer that will be generated will be automatically added to the composition and to the project panel. If you generate multiple Fill Layers (for example when trying out different settings) you can tell After Effects to delete unused fill layer footage in the panel menu.
“If the final video clip will be color graded or handed to VFX artist, you should export to a 16 or 32 bpc image sequence.
There are so many scenarios when this feature will make your life easier. From logo removal to removing camera equipment that happened to find its way into the shot. I can even think of more complex examples where we could basically bend the reality.
So tell me, are you ready to find the following note from your client on Wipster? Believe me, before content-aware fill, it used to be dreadful because it meant hours of manual clean plate masking and tracking. But not anymore!
Let us know what you think about that feature in a comment below and if it will find its spot in your workflow.