.png)
There are few universal pleasures in life that everyone can agree on. Waking up on vacation and stepping out onto the beach. Giving a loved one a gift you know they’ll treasure. Perfectly splicing and marrying two sections of the same song together in a timeline. It’s the simple things.
I think every video editor has had a secret desire to become a DJ at some point in time or another. There’s just something about taking a five-minute and 37 second track and whittling it down to a slick two minutes and 13 seconds with no noticeable cuts. But while there is a certain joy in manually beat matching and cutting at the sample level, it can be time consuming and that’s where Audition’s Remix feature comes in.
“While there is a certain joy in manually beat matching and cutting at the sample level, it can be time consuming and that’s where Audition’s Remix feature comes in.
Remix has been around for a couple years now, but has gone overlooked by many editors. It can cut down what was once a lengthy workflow to a matter of seconds. And it’s still fun, too!
First off, let’s understand what Remix is not.
It is not going to re-edit your entire video for you if you already edited and timed out a cut-in-beat-to-the-music piece. In most cases, Remix should be used before you begin editing, when you know approximately how long you need your song to be and you’re willing to let Audition make some of the editing choices.
There are effectively a couple workflows to get this process started. While you can take an entire sequence from Premiere and use Dynamic Link to bring it to Audition, that is probably a bit overkill in this scenario since it’s really only one file we need to modify. And for those of you wondering if you could just take a song file sitting in your Premiere timeline and just choose the Edit in Audition command, theoretically you can, but as you’ll see in the workflow, you’re going to end up exporting an entirely new file from Audition that would need to be re-imported back into Premiere regardless. So let’s just start in Audition!
Getting Set Up
Don’t worry if you haven’t spent much time in Audition. This is a very simple, “get in, get out” process. First, import a song file of your choosing into the Files panel, which is nearly identical to Premiere’s Project panel. Keep in mind, the song must be DRM free. Something like a track downloaded from Apple Music subscription won’t work, but a purchased track will. Check the song’s sample rate in the appropriate column. Most music files are 44100Hz, but you might have some that are 48000Hz.

After you import your music track, right click to insert into a new multitrack session.
Next, you have to create the Audition equivalent to a sequence, which Audition calls a multitrack session. Simply right click on your imported file and choose Insert Into Multitrack -> New Multitrack Session. In the box that pops up, name your “session” (again, think sequence), pick a location for it and other cache files to written to, and lastly, double check the sample rate, which you want to match your song file. If you are unsure, you can check the Sample Rate column in the Files panel.
The Fun Part
Once you’ve set up your multitrack session, click on the Properties tab on the left side of the interface if it isn’t already selected. There you will see an option to “Enable Remix.” Click it and wait a few seconds as Audition analyzes the audio file for beats and potential cut points. This is where the fun begins.

Use the properties panel on the left to enable “Remix.” and then enter a new duration in “Target Duration.”
In the same properties panel, enter your desired value/length into Target Duration. Voila! Your song is instantly retimed. But how? Look closely at the audio track. You’ll see a few squiggly lines running vertically through the audio clip. This is where Audition cut out a chunk of the song and married the two pieces together, almost always seamlessly. Take a listen! What’s also fantastic is how Remix always maintains the start and end of the song file, so you’ll always have the original intro and outro.

After you enter a new target duration, your track will be analyzed. Then you will see jagged cuts where your music is spliced together to magically create your new target duration.
Remix won’t usually get the exact duration you entered, but will get quite close, based upon the cut points it found. However, if you need it to be precise, the first option under advanced settings is “Stretch to Exact Duration.” This will perform a slight time stretch on the music while maintaining pitch in order to reach your exact needs. If you know the piece of music well, you might be able to tell that it is sped up or slowed down by a percent or two, but it’s usually very subtle.
No tool is perfect, and yes, you can get awkward sounding results in extreme circumstances. If you take an 8-minute epic like Stairway to Heaven and tell it to cut down to 30 seconds, it’s going to most likely play just the intro and transition bizarrely to the outro. But with the majority of songs with choruses and verses, it can do an amazing job blending sections of songs together, even sometimes blending lyrics together in a repeated chorus.
Not only is Remix a tool for pairing songs down, you can also use Remix to make them longer. Perhaps you have a brief 30 or 60-second piece of royalty free music that you like and need to cover a longer video. Merely enter a longer duration into the Target Duration value and Audition will find loop points to make the song longer!
Advanced Settings
There are a few parameters under the Advanced twirl down to know about that you can tinker with if you’re unhappy with the initial results.

Advanced remix controls within the “Properties” panel.
-
Edit Length: Set to the Long end by default, this parameter controls how many edit points you’re willing to let Audition make in a song. If you find there is an awkward transition between two very different parts of a song, try lowering the edit length, which might chop up the song into more pieces, but be able to marry more similar parts together.
-
Features: This slider seesaws between Timbre and Harmonic. Setting it closer to Timbre results in Audition looking more at tonal qualities to identify edit points whereas Harmonic makes Audition focus more on melody and harmony. Unless you’re a music major, that may not mean a lot, but this slightly falls under the category of “your mileage may vary” in how it chooses break in the song depending on the style of music. I often leave this one alone unless I’m not pleased unhappy with the initial results and experiment sliding it on way or the other to see how it might change the mix.
-
Minimum Loop: This decides the minimum length of a chunk of a song. Since it is measured in beats, it’s not a precise duration and will vary greatly depending on if you’re cutting electronic music versus classical.
-
Maximum Slack: As noted above, Audition doesn’t often nail the exact duration you entered, but gets pretty close. How close? By the set Maximum Slack. Set to 5 seconds by default, I have rarely found a need to increase this, but if you do, it can result in smoother transition points in case you hear any awkward cuts on the first attempt.
Pro tip!
Audition can sometimes be tricked into getting very close to your targeted duration without having to choose “Stretch to Exact Duration.” Let’s stay you entered a target value of precisely one minute, but Audition gave you one minute and two seconds. Sometimes entering a nearby duration like 58 seconds or 1:03 will produce a result that is almost dead on with your actual desired time! It takes some fiddling with numbers, but I’ve gotten it to work many times.
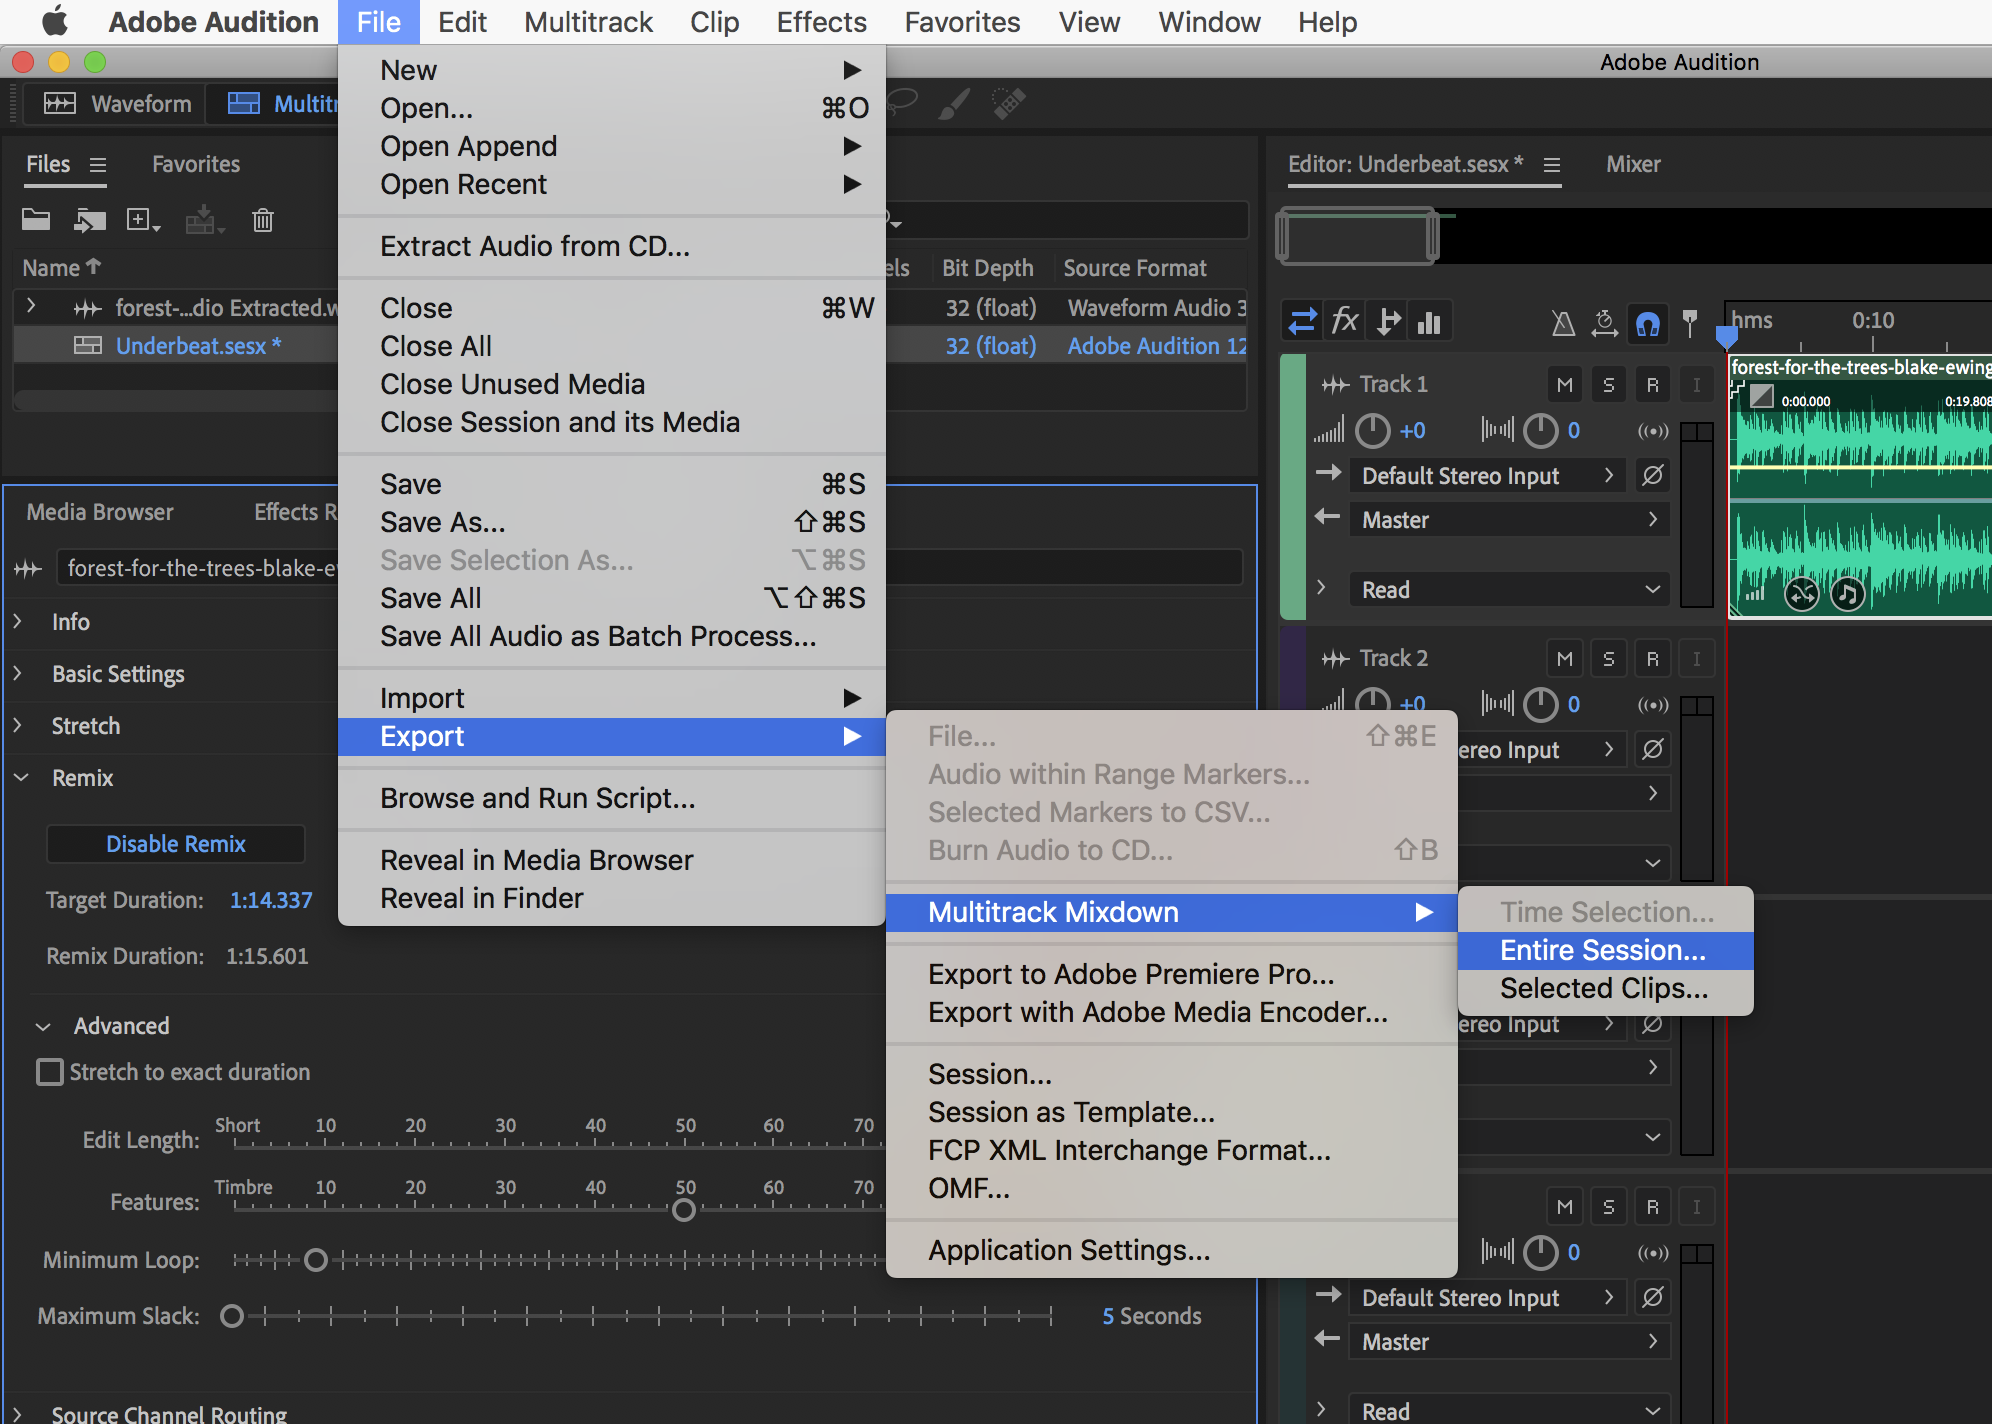
Exporting your remix
When you’re happy with your newly spliced song, go to File -> Export -> Multitrack Mixdown -> Entire Session. This window should be pretty easy to get through; simply select a name and location to save the file to and pick your audio format of choice (WAV PCM aka .wav is always a safe option to maximize sound quality). If you need to pick a compressed format like MP3, make sure it’s a high bitrate, around 256 kbps or greater.
That’s it. Your new song is ready to import into Premiere or any NLE of your choice. You can now rebrand yourself as DJ Adobe, which, frankly, isn’t a terrible DJ name.
Did you know Wipster now supports collaborative audio review? Learn more about it here. Also, have you had fun using Audition on a particular song? Was one just too challenging? Talk about it below!